Configuring LTI Integration in Canvas
Abstract
This guide will show you how to connect Canvas to the Cyber Range as a Canvas administrator and as a Cyber Range Organization Admin.
Overview
Connecting to Canvas will allow your students to use the Cyber Range without leaving their Canvas window. When connected, all of your students in Canvas will be imported into the Cyber Range.
The Cyber Range uses LTI 1.3 to integrate into this service so any Learning Management System, such as Blackboard, that supports this standard should be compatible with the Cyber Range.
There are three sequential steps required to complete this integration and each will require a specific permission level:
- Setting up Canvas requires the Canvas administrator role.
- Setting up the Cyber Range requires the Cyber Range Organization Admin role.
- Linking Canvas to the Cyber Range requires the Canvas Teacher and Cyber Range Instructor roles.
1. Setting up Canvas
This section will require administrator permissions in Canvas to complete. For additional details on LTI 1.3 integration, please visit Instructure's documentation on configuring LTI 1.3.
Create a new LTI key
-
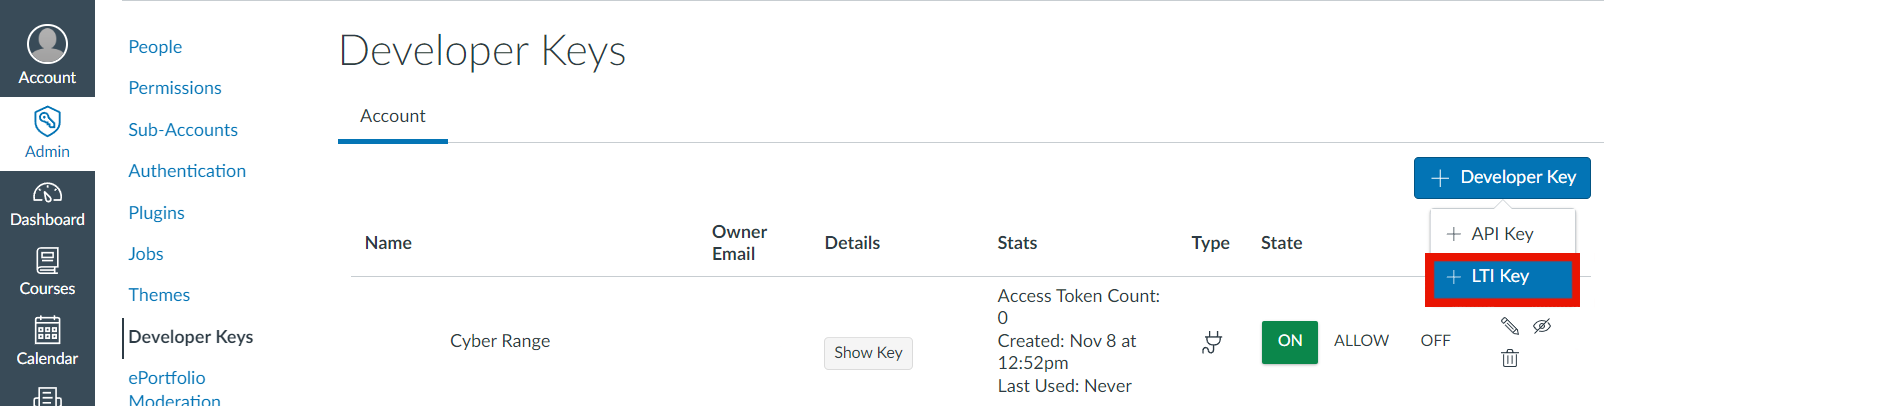
Log into your administrator account in Canvas and navigate to Admin > Site Admin > Developer Keys
-
On this page, click on + Developer Key on the right side and select + LTI Key
-
This will open a menu where you can configure the new LTI key. You can name it something memorable (i.e. Cyber Range) and enter the following information:
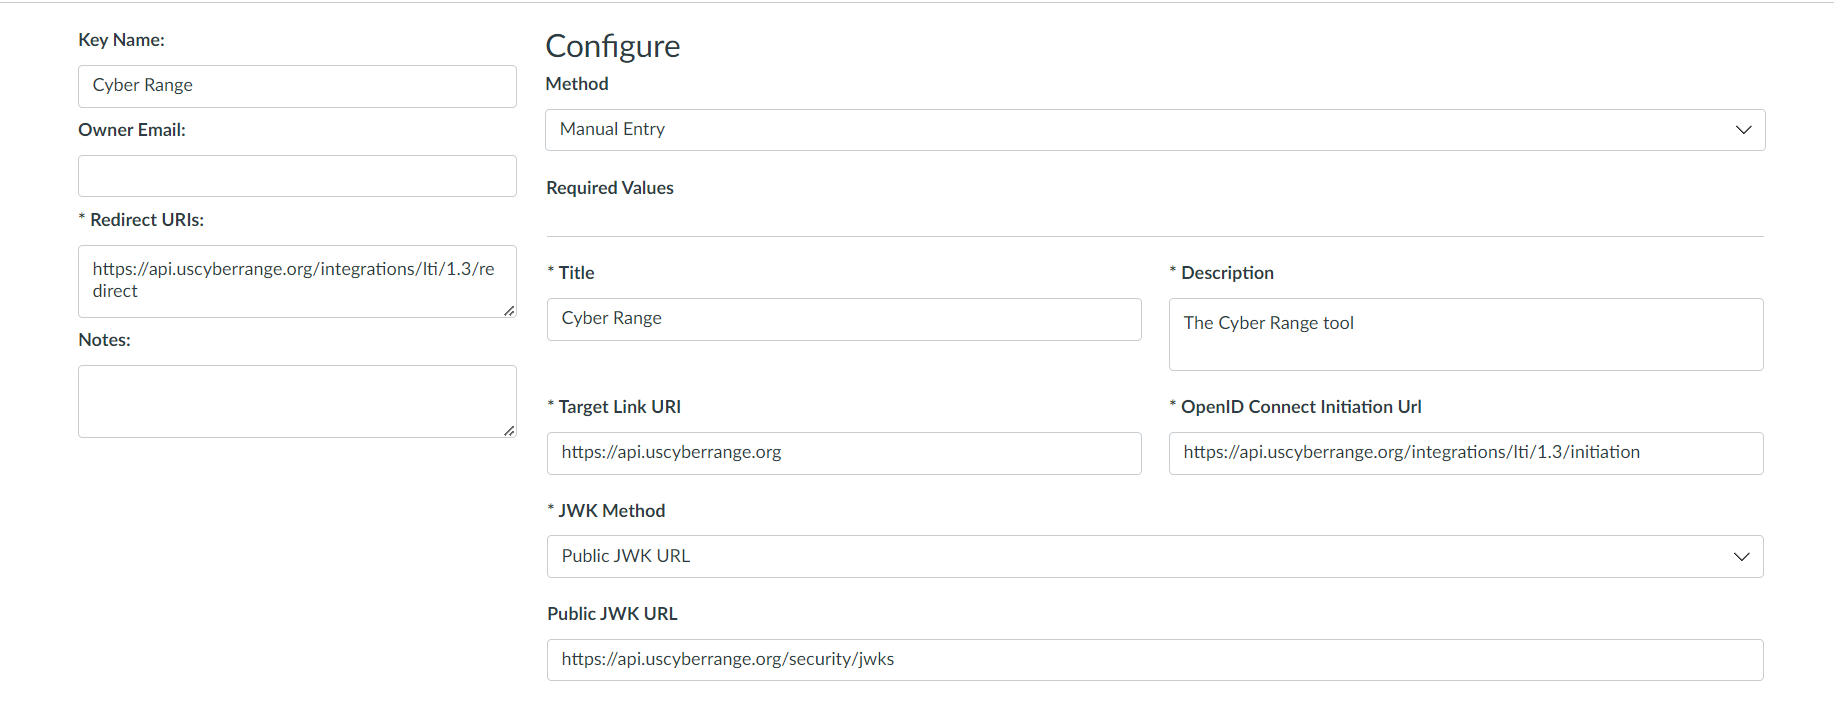
- Redirect URIs: https://api.uscyberrange.org/integrations/lti/1.3/redirect
- Target Link URI: https://api.uscyberrange.org
- OpenID Connect Initial URI: https://api.uscyberrange.org/integrations/lti/1.3/initiation
- JWK Method: Public JWK URL
- Public JWK URL: https://api.uscyberrange.org/security/jwks
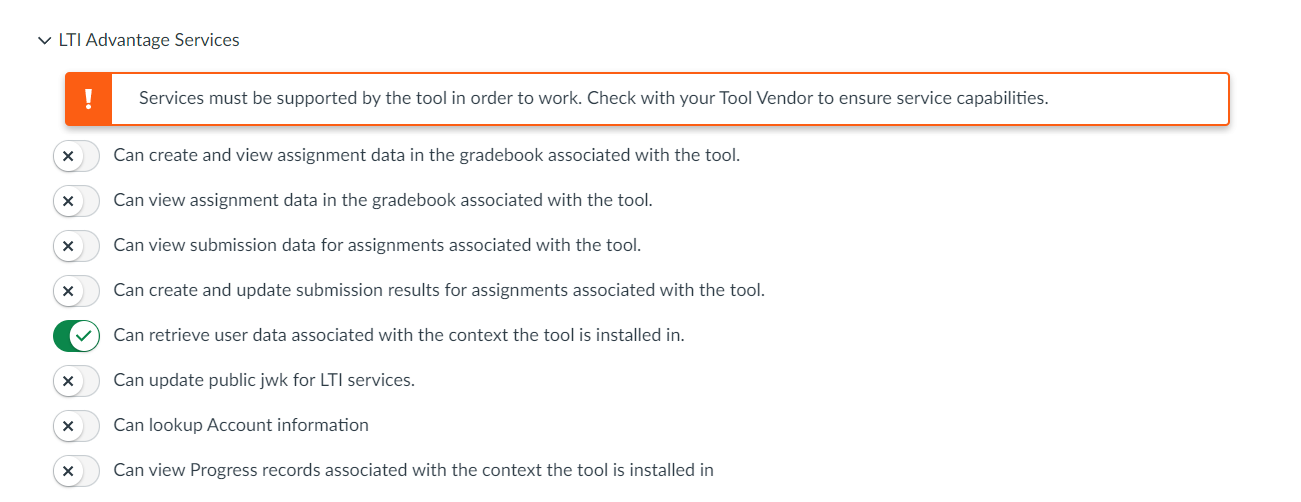
- LTI Advantage Services: In the list of options, enable "Can retrieve user data associated with the context the tool is installed in." This will allow users to be synced between Canvas and the Cyber Range.
-
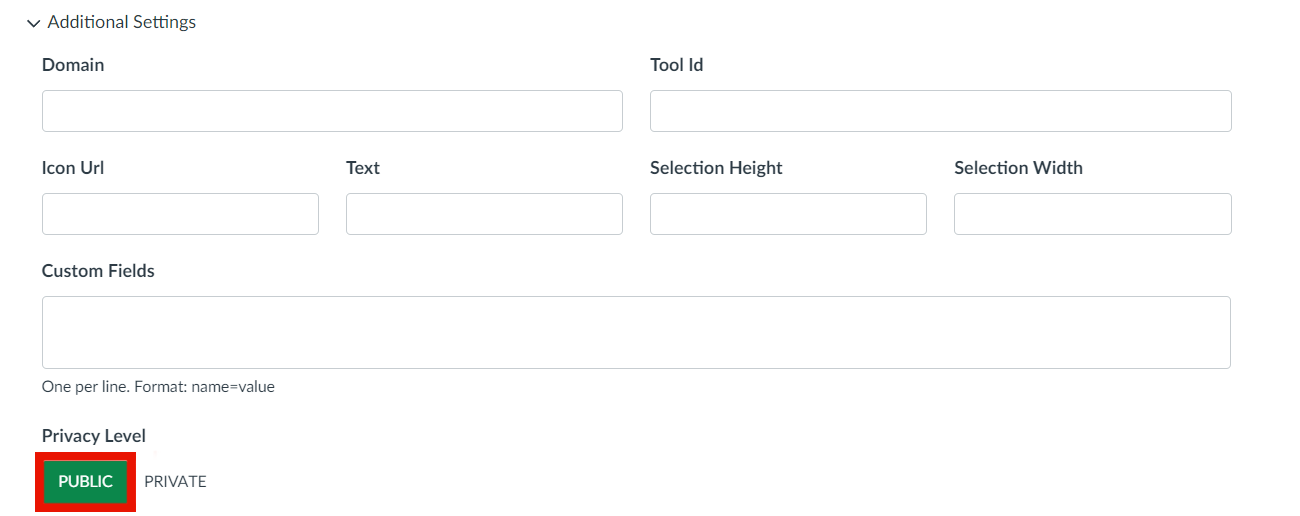
Additional Settings: In the list of fields, setting the "Privacy Level" to Public will display the Canvas users' names and emails in the Cyber Range. Setting the "Privacy Level" to Private will assign randomly generated names (such as "Curious Penguin 13") to users to display in the Cyber Range instead.
Important
For organizations with the Anonymous Users feature enabled, please be sure to set the privacy level setting to Private in your LTI configuration. Otherwise, the LTI integration will fail. This is designed to ensure user information is not shared.
- Placements: If you would like to add the Cyber Range application to all your Canvas courses, ensure you select the "Course Navigation" option under the Placements section. If you wish to make customizations to navigation and placement within Canvas, please visit the Canvas Course Navigation Placement documentation for more information.

Retrieve Client ID
-
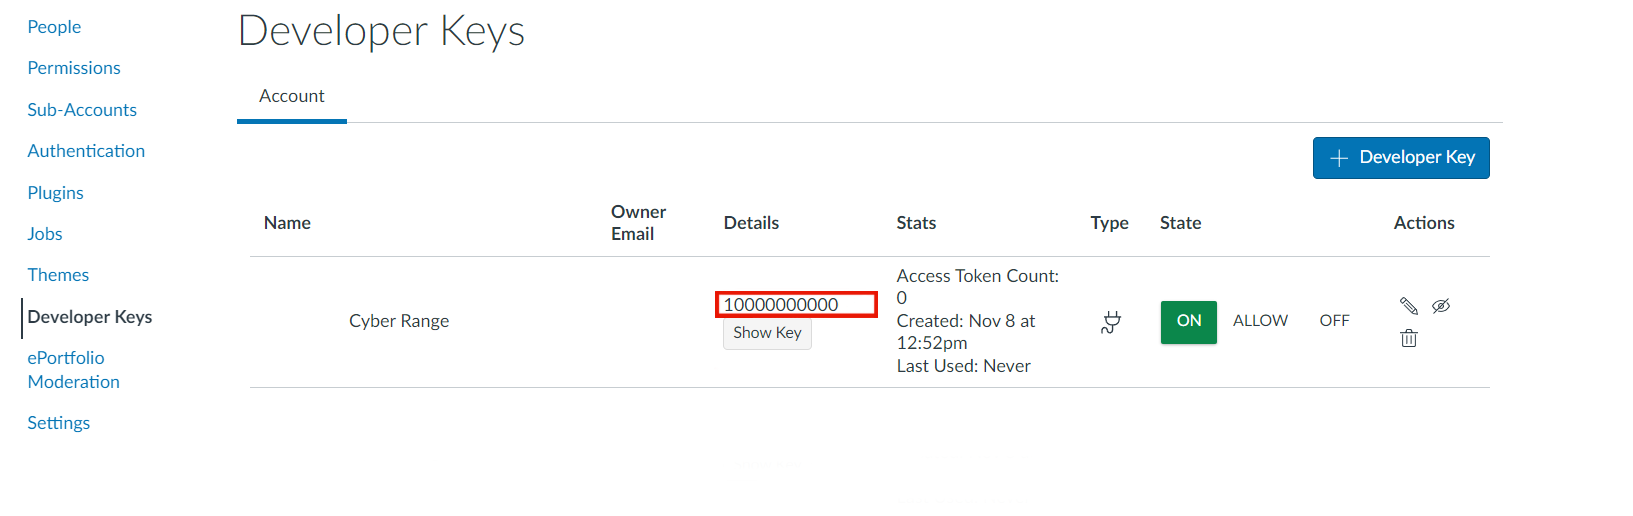
Ensure that your new LTI key is on the Admin > Site Admin > Developer Keys page. The State of the key should be set to ON.
-
In the Details column, a long number that represents the Client ID of that developer key will be displayed. Take note of this number, as it will be needed in the next step.
Add Cyber Range App to Canvas
Note
This step can be done at either the account, sub-account, or course level. When done at the account or sub-account level, the Cyber Range App can be present in multiple courses. Both levels follow the same process below.
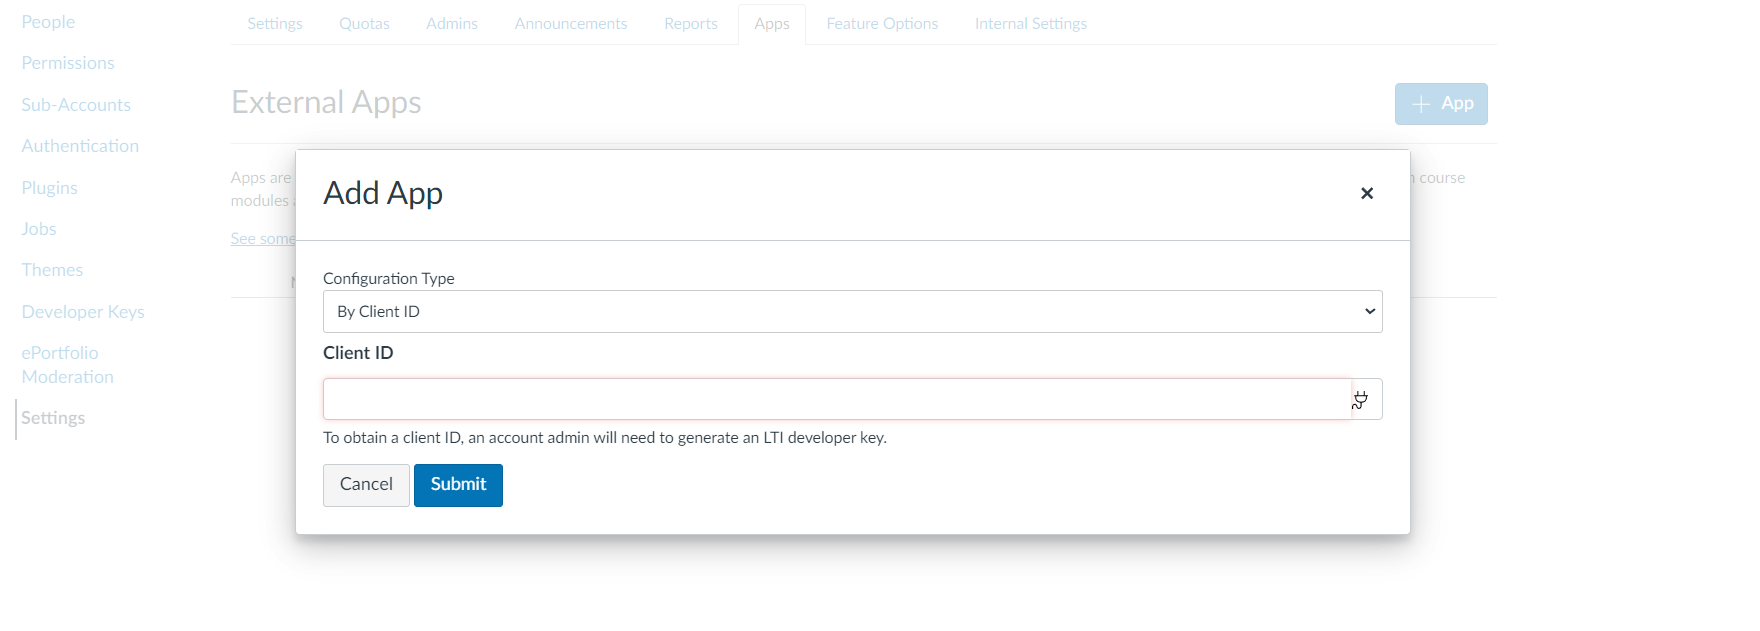
-
In the Canvas course that you want to add the Cyber Range app to, navigate to Settings > Apps
-
Click on the + Apps button
-
Set the Configuration Type to "By Client ID" then paste your Development Key's Client ID into the second text box. Click Submit to complete the App creation.
Retrieve Deployment ID
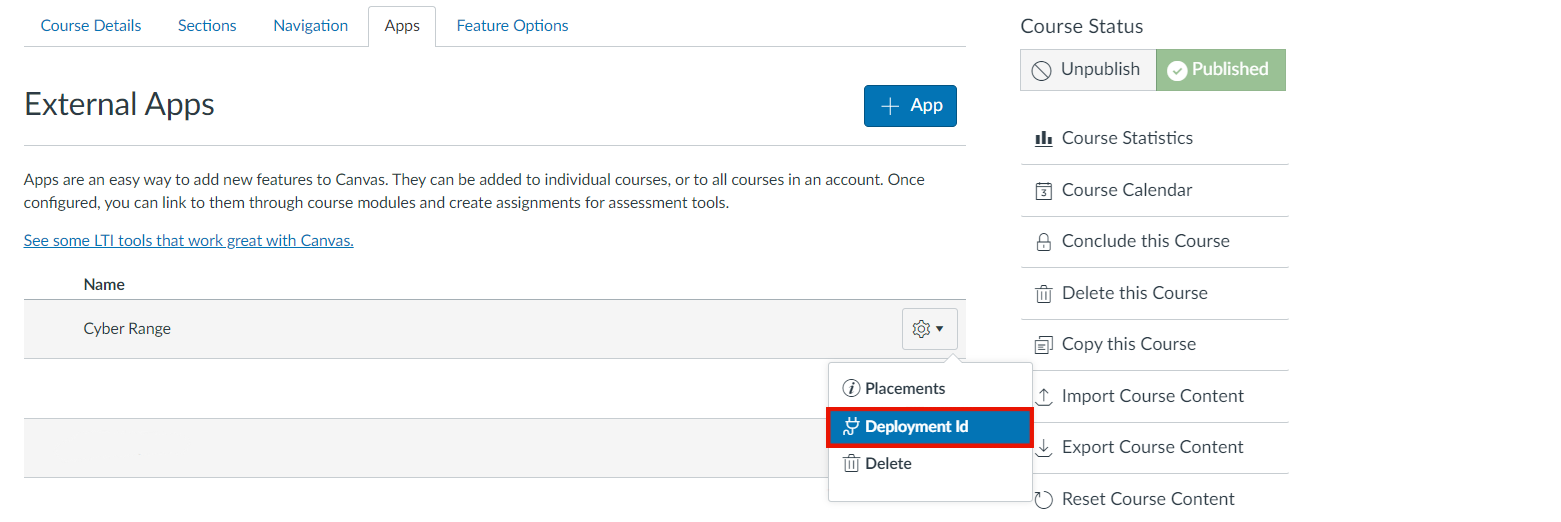
-
Within the same Apps tab, click on the gear icon to the right of your new Cyber Range app.
-
Select "Deployment Id" to view the Deployment ID.
-
Take note of this deployment ID and save it for later. You will need this to connect the Cyber Range to Canvas.
2. Setting up the Cyber Range
This section will require organization admin permissions in the Cyber Range. You can configure this at the organization level, which will allow your instructors to sync their Canvas courses with the Cyber Range.
Navigate to Applications Page
-
Log into your Cyber Range account
-
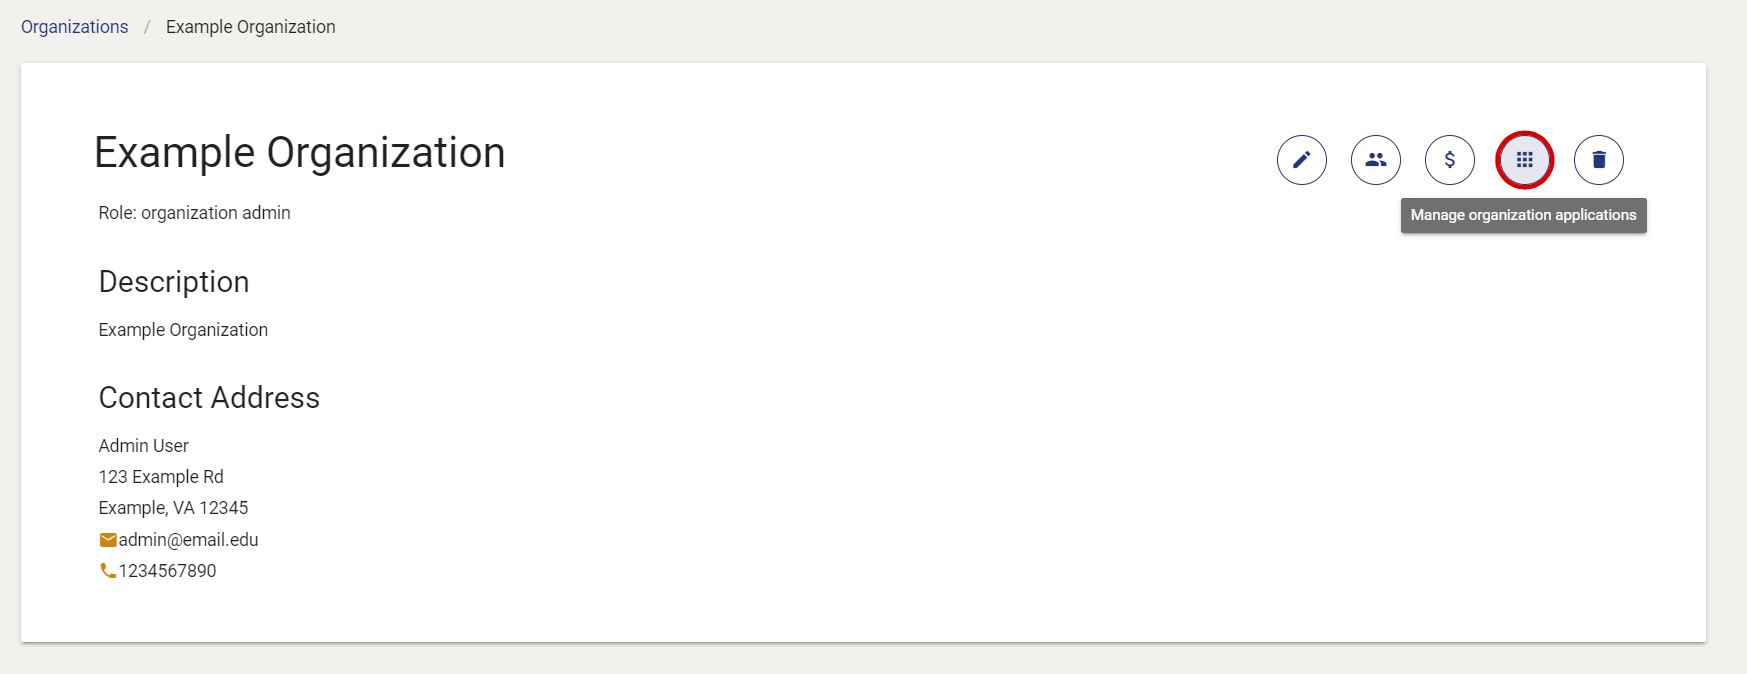
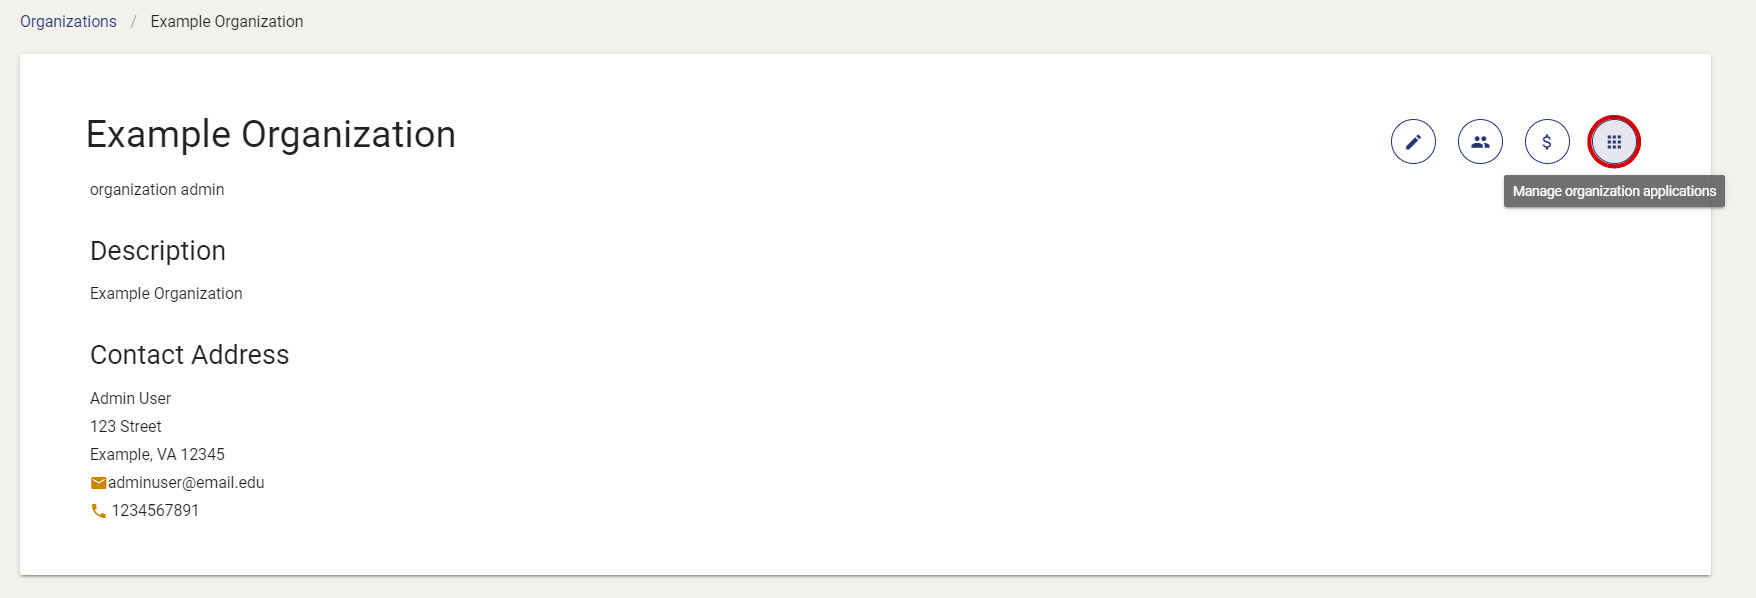
Click on the Organizations tab and select your organization
-
Click on the Connected Apps button
Add the Application to your Cyber Range Organization
-
Click the Create an Application button

-
In the "Type" dropdown box, select LTI 1.3
-
Give the new application a memorable name (i.e. Canvas Test)
-
Fill out the rest of the form based on the information below:
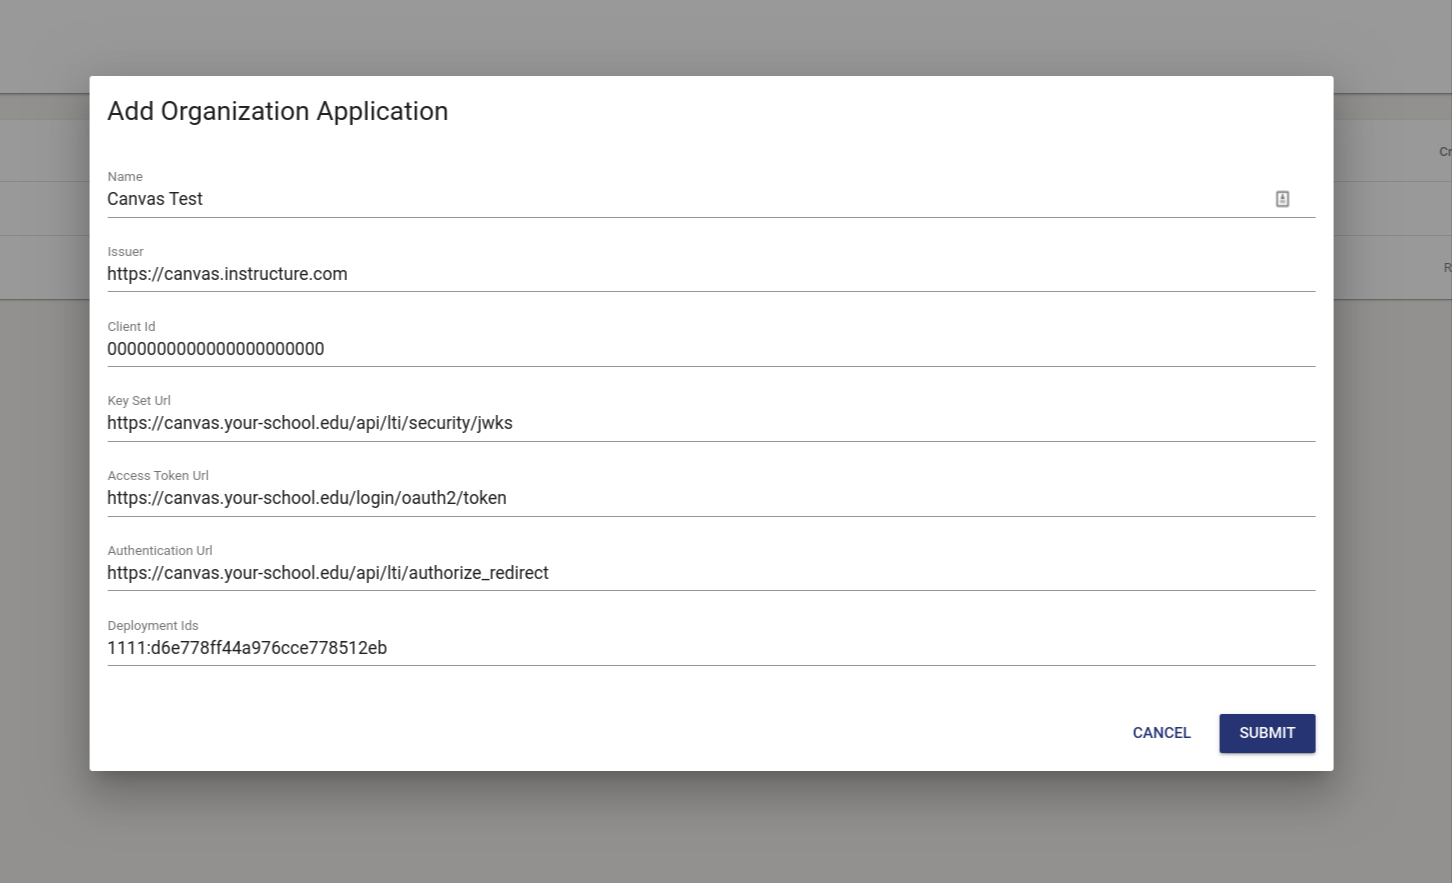
- Issuer: For production instances of Canvas, this will always be https://canvas.instructure.com. For test or beta instances, it will be https://canvas.test.instructure.com or https://canvas.beta.instructure.com.
- Client ID: Client ID retrieved from Canvas. Please visit the section above titled Retrieve Client ID for more information.
- Key Set Url: https://[SCHOOL CANVAS DOMAIN]/api/lti/security/jwks
- Access Token Url: https://[SCHOOL CANVAS DOMAIN]/login/oauth2/token
- Authentication Url: https://[SCHOOL CANVAS DOMAIN]/api/lti/authorize_redirect
- Deployment Ids: Deployment ID from Canvas. Please visit the section above titled Retrieve Deployment ID for more information.
Note
[SCHOOL CANVAS DOMAIN] refers to the domain name that your school uses for Canvas. It will likely take a form like this: canvas.your-school.edu.
3. Linking Canvas to the Cyber Range
Create a Course
If you don't already have a course in the Cyber Range, please create one now. Please visit the article titled Creating a Course for more information. Ensure that you are designated as the instructor of the course before trying to complete the connection.
Log into Your Cyber Range Account in Canvas
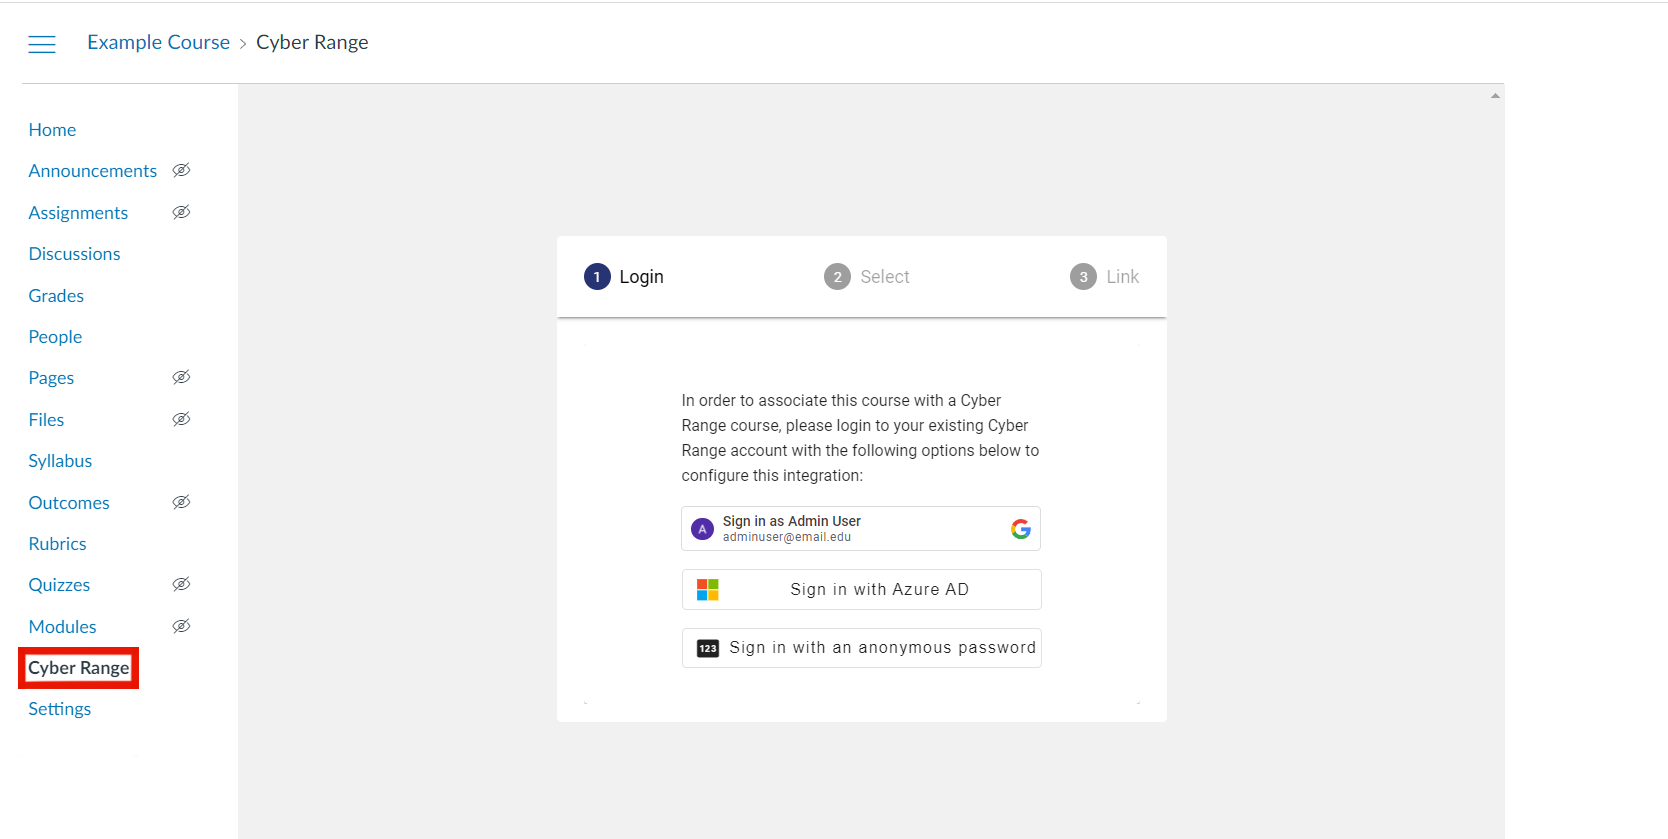
-
In your Canvas course, the app you created earlier should be displayed along the left navigation pane. Click on the app you created. Our sample app was called "Cyber Range".
-
If the connection was successful, a prompt to login using the authentication provider of your choice should now be displayed. Choose the login option that corresponds to your Cyber Range instructor account.
Choose a Cyber Range Course for Integration
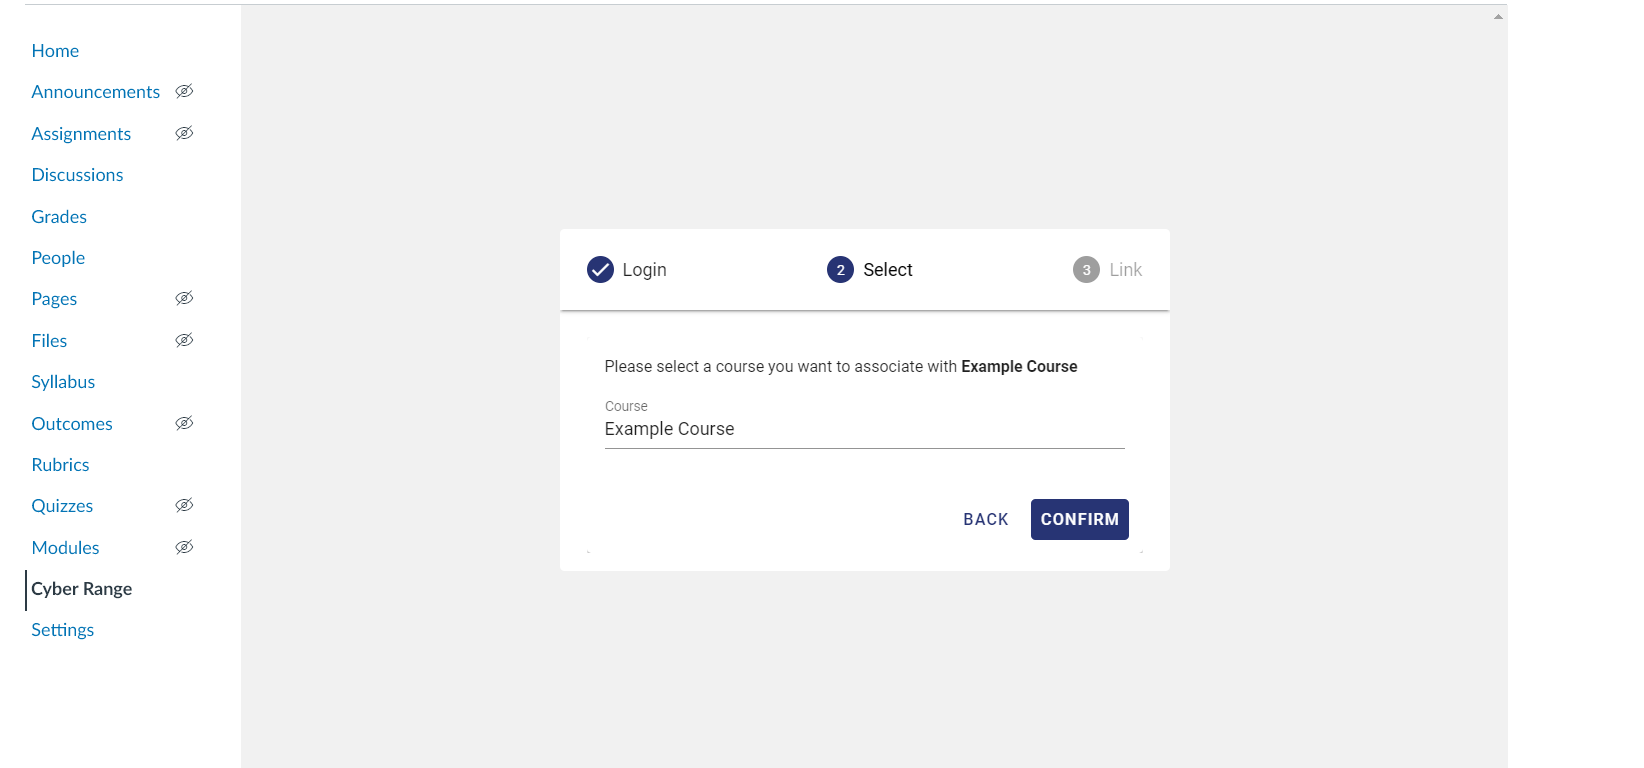
-
After logging in, you will be presented with a drop-down box that includes all of your Cyber Range courses. Select the course you want to link.
-
Click CONFIRM and wait for the courses to be linked.
-
Once it has finished the linking process, the Cyber Range UI will be integrated into your Canvas window.

Unlinking an LTI Integration
In the case you accidentally link the wrong course in the Cyber Range to Canvas, please follow these steps below to unlink an LTI integration.
-
Begin by navigating to the Course that was linked to Canvas. Click on the Connected Apps button.
-
In the Applications page, the LTI integration that is connecting the course to Canvas is shown. Select the cog wheel icon, where you will have an option to delete your integration. Press Delete.

-
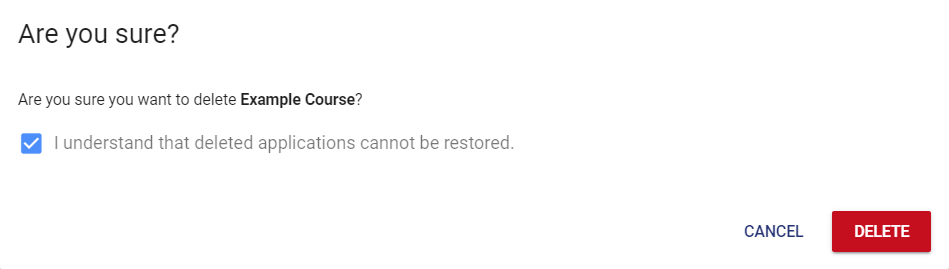
After selecting the option to delete the integration, a confirmation message will appear. Check the acknowledgment box, and then select Delete.
-
The integration has now been successfully unlinked from Canvas. You can repeat the steps above to reconfigure your correct Cyber Range course as described in the previous section.
Have a Question? Contact Support
We're here to help you. If you still have questions after reviewing the information above, please feel free to submit a ticket with our Support Team and we'll get back to you as soon as possible.
Thank You for Your Feedback!